Tuesday, November 15, 2011

6th Birthday Tea Party

 This is Minion 1. She told me that for her birthday this year she wanted to have a "unicorn tea party". I was stumped, really stumped. I mean, a tea party i can do. A unicorn party i can do. How the heck do i pull off hooking them together? Mind you, we have a thing in our house about parties. Every other year the kids get a big party rotated with a small sleepover party. This year was a small party after last years puppy party with 15 preschoolers in attendance (what was i thinking?). Anyhow I got a little inspiration in the form of a not so pretty yellow water pitcher with roses all over it. unfortunately i had craft vomit and didn't even think to take a before picture. This water pitcher was a lifesaver in so many ways i cant even explain. It not only gave me the inspiration for the party, but upon purchasing it at a garage sale for 50 cents, I met the nicest lady who gave me her number and helped to get minion 1 into a daisy girl scout troop! I had been trying unsuccessfully for over 5 months to get her in and in meeting this woman my baby was in a troop that week. Wow! What a lucky pitcher! Anyhow, I digress...heres the pitcher after i decoupaged it with random silver and and toile designed paper i had laying about.
 This is what I came up with and it turned out GREAT if i do say so myself! I started with the water pitcher and placed a "bouquet" of tree branches in it (one of them still had moss on it! YAY!!!) and then bought the pink Christmas ornaments from walmart for under 4$. Then i decided to add a runner, and since i don't have one i used plain pink wrapping paper down the center of the table and then placed doilies on it down the center. I used pink heart wrapping paper to kind of cover up my china and then strung her name up in doilies too.
 Chocolate covered strawberries were a must have so i made those. They were totally gone within the first 20 min of the party! I used a bag of semi-sweet chocolate chips and melted them with a tbsp of shortening in the microwave stirring every 5 seconds to prevent burning. then dipped the strawberries and chill. I accidentally froze a few resulting in a mushy mess...oops.
 And how did i tie in the unicorns you ask? Well if i were doing games we could do "pin the horn on the horse" or do a horn craft or something, but we werent doing any of that big stuff this year, so i just popped one on the cake.
 The cake turned out ok. Im not a fan of strawberry cake and thats what she asked for so the cake was just from a box but i jazzed it up a bit with food coloring and then made homemade cream cheese icing which turned out WONDERFUL! Heres the recipe:
  • 4 oz unsalted butter (softened)
  • 4 oz cream cheese (softened)
  • 3 cups powdered sugar
  • 1 tbsp vanilla extract
  • mix well with electric mixer until well blended. add food coloring

here's a little peek inside the cake...nom nom nom....


 As far as food goes, since the party was 5-8 with only 2 girls sleeping over i had to serve dinner. I made chicken salad for finger sandwiches (just boiled and shredded chicken and added a little mayo and halved red grapes) and turkey and cheese roll-ups (turkey lunch meat with american cheese rolled up in tortillas with a toothpick to hold it together). The roll-ups were GONE! I had to make more of them, but the chicken sandwiches (one of Minion 1s favorites) went pretty much untouched. Oh well.
 The rest of the spread was pretty simple- veggies and dip, ants on a log (with and w/out raisins), sliced apples (tossed in lemon juice to prevent browning) with caramel dip and they were all served pink lemonade.

It was a hit! The girls played twister as the ice breaker and then we headed outside with flashlights for a little flashlight tag and a game of "ghost in the graveyard" and a few others. Im pretty sure the girls all had a good time. Instead of traditional favors i made suger cookie pops with just a bagged mix for the cookies, Wilton lollipop sticks (like 2.50$ for 25 of them) and then powdered sugar icing (powdered suger and a tiny bit of milk) and popped them in some cello bags.

Other than food the whole thing was under 30$. The food we made sure was stuff we could eat leftovers of the following day or for snacks later so there was no waste. On another day i will have to write about the cake balls that i had attempted to make to go with this party.....here is a hint NEVER AGAIN!!!! Next time i am just buying doughnut holes and popping them on sticks hahaha!

Friday, September 2, 2011

Learning to crochet...

So ive had a few friends that know how to crochet quite proficiently. I have always wanted to learn. I asked to be taught but it seems that time always escaped us and now i live pretty far from most of them So thats when i though...Ill teach myself! Ok let me be honest here. I have been supposed to "teach myself" to play the acoustic guitar that has been sitting in my room for years. I have yet to try more than twice. Time always escapes me. Im also Pretty good at doing alot of things, but I am yet to find something that I am really good at. Well my friends, i think i may have found my nitch! I am just learning and im pretty good at it if i do say so myself :) So i started off by buying a kit at wal-mart called "I taught myself to crochet" It helped with the basics. I learned how to hold the string, how to do a chain, single and double crochet. I made my first few blankets....they looked awful. I guess i didnt quite understand. I never really have the money to go out and just buy stuff to mess around and see if i can do something. It doesnt work like that when you are living on one income. two years ago on my wonderful sister in law gave me an amazon gift card. YAY!!! I bought the Crochet "For Dummies" book. and have been slowly going through it over that time and made some junk and now am starting to really get the hang of it. I skipped the first few chapters since i knew some of the basics already. But it worked out great, even now if i come to something i dont understand or remember i can refer back to previous chapters. Ive never used a "For Dummies" book, but they way it is set up is so easy and user friendly that i will definitely be using them again if the need or desire arises. So now without further ado, I have made a few things that are actually worthy of use!I have also taught myself amigurumi!I made a frog... For a first try i think its pretty good! Also below is a scarf i made using every stitch i know.


Don't Throw it Away!!!!!

Heres two great ways to recycle, One is an old standby for me, the other i just started doing the other day when i realized the area under my sink is a disaster.

Would you throw this away? You used the butter, now what?


Dont trash it, i flatten them out, put them in a freezer zip-lock and pop them in the freezer. Next time im baking and i need to grease up a cookie sheet or casserole dish, i pull one out and rub it on! Works great. Only then do the butter wrappers make their way to the garbage can in my house.

Next up, New use for Paper towel rolls. I always threw these out unless we were making binoculars or some other project for the kids. The other day I was grabbing a plastic bag from under the sink for doggie duty and i realized it was probably the messiest place in my house under there! The reason was all the plastic bags that i cant bring myself to throw away....they had taken over!!!! SO i decided something had to be done. shoving them inside each other just isnt working for me anymore. I feel like I read this somewhere or saw someone else do it, and i wish i could give credit where credit is due but i have no idea where i found this or whether it was just luck that i happened to look around the kitch and see the empty paper towel roll. I shoved all the plasic bags i could inside and have been collecting them and doing the same everytime the roll is empty. Soon i will have a nice neat stack of rolls of plasic bags. So easy to just reach in and pull one out!

Crayon Rocks


I did this project the first time with The big minion when she was about 3. Its one that you really have to judge your childs direction following skills before doing since it involes an oven and a hot cookie sheet. Basically you melt the crayons onto a hot rock. Stands up to the elements pretty nicely so we put them in the garden. My Iz USED to be a great listener HA! but in all seriousness, she is now almost 6 and still remembers doing this when she was little. We had a blast with this the other day :)


First you need to find some large rocks, which can be an adventure all on its own. We have a "nature bucket"  that we keep stocked outside with all sorts of treasure that  we find on our nature walks and such. Preheat your oven to 350 degrees and line a cookie sheet with foil. Place the rocks on the cookie sheet and pop them in the oven. for younger kids just a few minutes to heat it up should suffice, but we put it in for about 30 min (i may have forgotten about them for a bit..oops, oh well!). While they are heating up pick out some colors of crayone to use. I like to use old crayons we have stored in an empty coffee container. Peel back the paper off the crayons  Once the rocks come out of the oven they will be very hot. make sure to take caution that the kids avoid touching the rock or cookie sheet. If you want you can put dish old dish towels over the cookie sheet but keep in mind they may get ruined. Then you simply melt the crayons onto the hot rock by touching them to it. Its super easy and alot of fun if you keep safety in mind. Our rock was so hot that the crayon actually bubbled in some spots. It turned out beautifully.  Let cool completely before picking up.


Friday, August 19, 2011

Homemade Doggie Biscuits

Ingredients 
1 cup rolled oats or oatmeal
1 cup boiling water
3/4 cup cornmeal
3 teaspoons white sugar
2 1/2 teaspoons beef bouillon granules
1/2 cup milk
1 cup shredded Cheddar cheese
1 egg, beaten
3 cups whole wheat flour

1/3 cup butter or margarine
Flour for rolling out dough 

Preheat oven to 325. Stir together oats, margarine, and boiling water. Let stand 10 minutes. Grease cookie sheet. Add cornmeal, sugar, bouillon, milk, Cheddar cheese, and egg, and stir by hand with a spoon (do NOT use an electric mixer as it will become very thick and actually fried my mixer). Gradually mix in flour, 1 cup at a time, until a stiff dough has formed. Knead dough on a lightly floured surface adding flour until a thick dough is formed and it isn't sticky.  Roll out dough to about 1/2 inch thick. Cut with cookie cutter and place 1 inch apart on cookie sheets. Bake around 45 minutes in oven, until golden brown. Cool before serving. Store in a loosely covered container. after they harden up more you can put them in pretty much any container. They store very well and the minion had a BLAST making them with me  :)


Stinky Laundry

So lately i have been CRAZY cleaning my house. Its been a complete disaster with school starting, a thousabd and one doctor appts(long story) and just general family life plus me slacking off for a day (or week) here and there. I have scrubbed walls (water and borax) and bleached every hard surface in the house. scrubber behind toilets, cleaned out drawers (pencil baskets/utensil holders make great organizers - read:dollar store) And a bunch of other stuff. my downstairs is sparkling. I dont want to talk about the upstairs. On another good note Ive been getting rid of alot if stuff and selling it on craigslist and some local sales sites on facebook. Its been really great and ive been using the money i make to buy other things off the site that i want or need. Let me be completely honest...its how i bought my daughters back to school clothes. With me not working at the moment theres not alot of spare money lying around to buy brand new clothes, or other desires, so i have gotten very creative. I keep saying i will blog about how i coupon, and i still intend to. ive just been very busy and have decided to blog during JackJack nap time when i can. But i digress.... Occasionally lately i have noticed a strange smell popping up here and there. Im a clean freak so its really been bothering me. When i smell it i go around trying to figure out what it is sniffing like a crazy cop dog that smells crack. its bad. Well I recently figured out where the smell was coming from....random pieces of my families CLEAN laundry. In particular my husbands work shirts at the end of the day, a pair of baby pajamas, a blanket, and a pair of my jeans. Its bad. Well after a million and one washes i figured it out. My washing machine is dirty. I cant explain why somethings dont get clean and others do, but after cleaning the thing out it seems to have totally solved the problem. I have never really done a big clean on my washer. I always wipe it down with bleach when im running a load of whites, but thats about it. Well i found this tutorial over at Somewhat Simple and i would like to share it. seemed easy enough and her pictures speak for themselves. check it out! How to clean a washer. It worked for me :)

Monday, June 6, 2011

Cinnamon Raisin Bread from scratch.


Ingredients

1 1/2 cups milk
1 cup warm water
2 packets active dry yeast
3 eggs
1/2 cup white sugar
1/2 cup margarine (softened)
1 tsp salt
1 1/2 - 2 cup raisins (to your liking)
about 8 cups all-purpose flour
2 tablespoons milk
1 cup white cinnamon sugar
2 tablespoons butter (melted)

Heat milk in a small saucepan just until it begins to foam over and bubble. Remove from heat and allow to cool slightly. Dissolve both packets of yeast in the warm water, and set aside until it gets foamy. Mix together eggs, sugar, butter or margarine, salt, and raisins. Mix in the yeast and water. Stir in the room temperature milk. Add the flour gradually until it forms a stiff dough the amount needed will changed based on weather, humidity etc. If you have a mixer with bread hooks it will be enough flour when the dough "chases" the hooks. Knead the dough on a lightly floured surface for a few minutes and then place the dough in a large pre-greased mixing bowl turning the dough to grease the entire surface. Cover the dough with a damp cloth. Set aside and allow to rise until doubled. using a rolling pin o n a generously floured surface, roll the dough into a large rectangle about 1/2 inch thick. Moisten dough with the 2 tablespoons milk (I like to use a brush to do so). Sprinkle the cinnamon sugar mixture and raisins on top of the moistened dough. Roll the dough up as tightly as you can, Cut into thirds, and tuck the ends under the loaves. Place each loaf into greased 9 x 5 inch pans. Lightly grease tops of loaves as well. Cover and let rise again for 1 hour. Bake at 350 degrees  for about 40-45 minutes. Loaves will be slightly browned and sound hollow when knocked if they are done. Remove from pans and brush with melted butter and enjoy! yummy!

Who says you need alot of cupcakes?


OH WOW these were delicious. I only really needed one cupcake for a photo shoot that my son was doing for his first birthday. looked all over the internet for small batch recipes...ehhh ill just whip up something myself. To my great surprise THEY ROCK! these cupcakes stand alone and dont really need any icing....not that i would ever let a cupcake go un-iced....but anyhow....The recipe makes just enough for 6 flat-topped cupcakes.

Ingredients :

2/3 c. flour
1/2 tsp. baking powder
1/8 tsp. salt
4 tbsp. milk
1 1/2 tsp. vanilla extract
5 tbsp. butter, softened
1/3 c. sugar
1 egg

Honestly i just mixed it all together except the egg. Beat it really well by hand and then mixed in the egg last. Put into paper lined cups and bake in a preheated oven at 350 degrees and voila! Decorate as desired!

Wednesday, May 11, 2011

Homemade Fabric Freshener!!!!

This is gonna be a quick post. Im in the middle of trying to do my morning housework while the baby is asleep (sort of) and getting ready for an appointment later. So this is an EMERGENCY post as my neighbor had a smelly cat issue this morning, and it sounds as though Febreeze would be a big help :) I have seen a ton of recipes for Febreeze online, but Im shying away from any that involve vinegar. I didnt mind it on my floor as I posted yesterday, but on my couch??? Not so much. I messed around with some ratios and this is my favorite concentration. not to strong but definately fresh! Seriously This recipe works, I love it! My house smells like clean lavender scented laundry. My favorite!

My Fabric Freshener Recipe - 1 part scented fabric softener to 2 parts water

Thats it. simple. I will NEVER but commercial fabric freshener again. I buy the cheap fabric softener in lavendar scent and It worked just fine. Put it all in a spray bottle, shake and spray a mist onto fabric and sniff!

Tuesday, May 10, 2011

Homemade Household Cleaners

Ok, so I have been trying so different household cleaners for awhile now. a few I use on a regular basis, and a few I am trying for the first time. I'll start off with the things that I use on a regular basis.

Rubbing Alcohol - I LOVE to use rubbing alcohol to shine my metal sink, faucets and other metal items throughout the house. It sterilizes and evaporates immediately leaving a great shine. Simply put it on a soft washcloth (i use a baby cloth) and wipe the area to a shine.

Wood cleaner- mix 1 part oil (olive or even vegetable) to 1 part lemon juice in spray bottle. Shake well before use. Spray onto  soft cloth and rub onto wood surface. Cleans and shines.

Counters- I still just mix bleach and water. Let sit wet for 5 min and wipe off with wet cloth. Nice and clean.


Walls/cabinets/basebords- I just mix borax and water and wipe the area down. Works wonders.

waterspots on wood - toothpaste! let it dry and wipe it off.

I just tried these for the first time...

Floor cleaner. I usually just mix bleach and water and go to town. Mop & Glow if I need a shine. My husband is sick of the bleach smell and so I was serching for something else. I have a hardwood laminate floor in my house and I tried two types Borax and then vinegar lemon. let me tell you one thing before you read on. I HATE VINEGAR SMELL!! with passion. It makes me think of coloring easter eggs or eating fair fries...not something I want my house smelling like, but i tried it anyways...

Borax cleaner - 1 cup Borax to about a gallon of water. Mop as usual. I didnt like this one. I felt it left my floor very very splotchy. You could actually see the mop streaks on the floor. Not a fan and I wont be using this...

Vinegar Lemon- 1 cup white vinegar, 1/2 cup lemon juice, 1 tbsp dish soap. Mix in about a gallon or so of water. Mop as usual. I was actually pleasantly surprised. It did smell of vinegar, but the lemon covered alot of the smell and once it dried it wasn't noticeable at all. It cleaned very well. Left a pretty decent shine to the floor also. Dried quickly. I can't believe im saying this as much as I am against using vinegar in cleaning, and as much as the smell offends me.... but I have now used this more than once. I will probably continue to use it also.....

Dishwasher detergent

1 cup borax, 1 cup washing soda, 1/2 cup salt, 1/2 cup citric acid.
OR
sub the citric acid with 8 packets of unsweetened lemonade (kool-aid or off brand)
Use white vinegar as the rinse agent

Citric acid costs entirely too much so I followed the second recipe. works well enough. Some spots on my glasses, but I have that even with the expensive stuff so no difference in quality as far as I can see. Now mind you that my dishwasher sucks so if yours is a good dishwasher and you try this let me know how you like it.
 
Anyone else have any good tips for cleaning? I'd love to hear you share!!!! The cheaper the better. Ha!

Monday, May 2, 2011

Homemade Ricotta Cheese


Ok, I came across this recipe for the first time in a cookbook I checked out from the library called Family Meals. There are plenty of variations online, including this exact recipe. I thought it was a really neat cookbook with unusual things that I hadnt even thought of. Its also the book where I got one of the recipes for marshmallows that I will be doing later this week
The ricotta turned out great. I wasn't sure it had actually worked until I was pretty much done with it. It is going to be used in a 3-cheese ziti that was adapted from a recipe my best friend Christy gave me. I'll post that recipe too, maybe tomorrow?

Ingredients

1 gallon whole milk
2 cups heavy whipping cream
1/4 cup plus 2 tbsp distilled white vinegar
1 tsp kosher salt


tools needed

1 large nonreactive pot (meaning no copper or aluminum)
instant read thermometer
silicone spatula
colondar
cheesecloth (muslin)
large bowl
slotted spoon
storage container


Pour the milk and cream into the pot over med-high heat. Stir with spatula to keep from burning. Check temperature frequently and heat to just before the milk boils to a temperature just shy or 185 degrees.
Remove from heat and add vinegar. stir for 30 seconds, during which the milk with form curds. Add salt and stir another 30 seconds. Cover the pot with a dish towel and let stand at room temp for 2 hours. After the 2 hours have past place the cheesecloth in the colander and place it over the bowl. Using the slotted spoon transfer the curds to the colander. Allow to drain for 30 min. Gather the cheesecloth and twist to drain out the rest of the liquid. When the water that is draining turns to a milky color and the cheese starts to come through the cloth then it has been sufficiently drained. Remove the cheese from the cloth and store in airtight container in fridge. Use within one week.

Check temperature frequently. Remove from heat just before 185 degrees.

Curds will form quickly after adding the vinegar.

Make sure to store in airtight container.

Sunday, May 1, 2011

Homemade Butter


I was actually giggling when I made this...seriously. For some reason I thought It was really really neat to watch it actually separate and form butter. My husband is pretty sure that I have lost my mind...
Anyhow this was really easy and it tastes like....butter!!!!

Ingredients

2 cups heavy whipping cream
1 tsp salt (more or less to taste)

Pour whipping cream into a blender or food processor. Blend for 10 min. Make sure as the cream becomes more thick that it keeps blending. I dont have a food processor so i had to keep pushing mine down into the blender to ensure it kept moving. After about 10 min you will notice that the cream has begun to curd and separate into butter and buttermilk. drain off buttermilk into a cup and place the butter into a separate container. Use a spatula to press down on the butter to squeeze out the remaining buttermilk into the separate cup. Add salt to butter to taste.  Refrigerate. Retain buttermilk for pancakes, or other recipes :)  Too easy!


Thursday, April 28, 2011

Plans for the upcoming month(s)....

So I have alot I'd like to attempt this month so stay tuned! First things first is the cloth diapering of my 11 month old. Wish me luck! My cousin mailed me out a few gbaby diapers and I think a few others and I think my husbands cousin may be sending me a few fuzzibunz to try out. The goal is to figure out which I like best, and then make the switch. Not only to I always try to be more frugal, but If I can be environmentally conscious at the same time, then that's the route i'm taking.
Izzie and I have made a few plans for her home schooling for the next month. I think I will post the completed lesson plan on here next week. One option was to focus on learning about different countries around the world "Around the world in 30 days" if you will. The goal would be to boost cultural awareness and acceptance through learning utilizing art, math, music, food, books, and games. Any suggestions are always welcome.
I'm going to go ahead and put it out there, Im also going to TRY to be pretty ambitious on the homemade front. I launched Little Bugs Boutique last week, and have a few example items up for sale on the facebook page. obviously i'm going to try to keep adding to that this month if our budget allows me to purchase a few supplies. Im also going to be trying a number of recipes for homemade items that I have come across and I'll go ahead and let you guys know how they all work out so if you'd like to attempt it also you can, of I can let you know how awful things turn out and try to spare you the trouble.  if anyone has tried any of these things already I would love to hear your personal experience.

All Homemade from scratch :)

dishwasher detergent
Household cleaners (I already use a homemade wood polish, counter cleaner, and stainless steel cleaner,
                               which I will also share)
Graham crackers
Ritz crackers
saltine crackers
butter
mayonaise
dog treats
croutons
marshmallows
ricotta cheese
cinnamon raisin bread


I feel ambitious :) Anyone else try any homemade recipes that are awsome? anyone ever make yogurt? Thants one i;d like to try too but im a little scared to.
I mentioned to my husband that if we had our own house i would love to have egg laying hens. just 3 of them. he looked at me like i was crazy. Its not the first time ive mentioned it, but i think he was surprised that i haven't given up on the idea.  He begged that i don't stop shaving my armpits, come to think of it, id save alot of money on razors......... hehehehe lol

Wednesday, April 27, 2011

Easy AND Delish Homemade bread


I don't have a breadmaker. I wish I did, but I don't. I love making a good homemade bread, and absolutely nothing can compare to the smell of fresh bread baking. The recipe below is the one that I learned on. It was the first bread I ever made by hand, and it is still one of my all time favorites! Its got a bit of a crusty top, but a smooth soft center. yum! 
Ingredients

3/4 cup warm water
1 pkg active dry yeast
1 tsp salt
1 1/2 tbsp sugar
1 tbsp vegetable shortening
1/2 cup milk
3 cups flour (approx.)

In large mixing bowl, mix yeast in warm water, stirring until completely. Add salt, sugar, shortening, and milk. Stir. Add 2 cups of the flour and mix well using hands or a mixer with bread hooks. Add flour until a cohesive dough forms, and the dough "chases" the mixers. Put dough in a buttered bowl turning so the top of the dough is also greased. Cover bowl with damp hand towel and let rise for 1 hour. After letting dough rise, punch it down in the bowl, then place it on a flowered surface and knead well. Place formed dough into a buttered bread pa. Cover again and let rise for 30 minutes. Uncover and score the top of the dough 3 times. Bake in preheated oven at 375 degrees for 30-45 minutes until browned.


Tuesday, April 26, 2011

Dont forget the basics....

 This past week I took a trip down memory lane. One of the most basic kids crafts/activities that there is. The pine cone bird feeder. My daughter, Izzie and her 2 best friends were so excited when we did these, I explained the project then sent them off in search of pine cones. When they got back and we were slathering on the peanut butter and making a huge birdseed mess all over my porch, the neighbor kids started gathering. They were asking what we were doing. Apparently most of them (not all) had never seen this basic project done. I was shocked. Me and my Izzie do this every summer. Its one way we ring in the warm weather, and bird watching season... I would never miss it, no matter how messy. The point here, don't forget the basics. Today is a day where memories are made. What kind of memories are you leaving your children?

The girls were so proud of their work!

Easter Sucess!!!!

Easter dinner was a total sucess! It was awesome! I picked up a bone-in shank portion on sale for $1.16/lb. I have never prepared one of these before, normally opting for the spiral sliced pre-cooked variety. When I opened it up IT HAD SKIN! EW!!!! I was completely grossed out. Ok, deep breath, we can deal with this. So I cut the skin and peeled it off, exposing mass quantities of fat. Ok, next hurtle. So i cut off all the fat that i could. Alright, that wasn't so bad. Pretty simple actually. Now I can handle this. I was a little worried that without the skin it could be dry, but I slow cooked it with a honey glaze and it was great! tasted delish! So here's the recipe for you!
Honey Glazed Shank Portion Ham

Ingredients

1 (5 pound) shank portion ham
1 cup brown sugar
2 cups honey
2 tbsp butter

Preheat oven to 275 degrees. Place ham in foil lined pan (you DEFINITELY want foil). Cook ham for 5 hours in oven. After ham slowcooks, in a small saucepan heat the brown sugar, honey, and butter. Add about 1/2 cup of the pan drippings to the glaze. Brush glaze over the ham. Put back in oven and set to 325 degrees for additional 1 hour, basting every 20 min. Cover loosely with foil to prevent burning if it starts to get too brown. ENJOY!


My other big success were my pull-apart herb biscuits. they are wonderful. Recipe as follows:

Ingredients

1 tube refrigerated buttermilk biscuits (grands size)
1/3 cup butter, melted
3 tbsp grated parmesean cheese
1 tbsp sesame seeds
1 tsp minced garlic
1 tsp dried parsley flakes
1 tsp dried basil
1 tsp dried oregano
1 tsp dried thyme

separate biscuits and cut into quarters. In an ungreased round pan, 9-in (i use a metal pie pan combine remaining ingredients and mix together. Add biscuits and toss to coat. Bake at 450 degrees for 8-12 min, until golden brown. Invert on plate to serve :)

Cheezy Black Bean and rice dinner/dip


Ok, so my pantry is empty...sad day to cook dinner for me. what to cook? well my husband is in the field training for a few days so its just me and the minions. SO, what i did was just throw together all that junk that sits in the back of the pantry. The result? Yummy :) The kids showed it down. I served this as a dip with tortilla chips. a bit more fun, but it could definitely be a beans and rice main course.

2 tbsp olive oil
1 can black beans, mostly drained
1 can Rotel
1 can corn
1/2 cup finely chopped onion
1/2 cup chopped red pepper
1/2 cup chopped green pepper
1 garlic clove minced
1 chicken breast, cooked and shredded
1 tsp chili powder
4 cups cooked white rice
1/2 cup shredded cheddar cheese
crushed red pepper as desired for spiciness

Heat oil on med-high skillet. Add onion, peppers, garlic, corn, and Rotel and simmer until soft. Remove from heat. In med saucepan mix together all ingredients. Heat stirring frequently. Serve. HA! easy as that. Plus yummy. next time your pantry is running low, or even when its not, you could try this!

Thursday, April 21, 2011

Homemade Peanut Butter Eggs


So Today I tried to make homemade Cadbury eggs from the instructables site. It was a disaster. A melty sticky, messy horrible disaster. I couldn't make them into eggs. It was gross. Plus, personally, I don't think they were that yummy.....HOWEVER, these turned out really yummy.  I used the stuff I had on hand to play around with peanut butter. I saw a few different recipes for these online, but I mixed them all up, did my own thing and voila! Just promise me one thing...don't ask how many calories are in them. I don't know, and don't wanna :)
Ingredients

8 oz powdered confectioners' sugar
1/2 cup creamy peanut butter
2 tbsp butter - room temperature
1/2 tablespoon milk
1/4 tsp vanilla extract
1/2 a package of  semi-sweet chocolate chips
1 tsp shortening  
 

In a medium mixing bowl, combine together powdered sugar, peanut butter, butter, vanilla extract and milk until blended. Put Shape mixture into small egg shapes (makes about 12).  Freeze peanut butter eggs for 1 hour. 

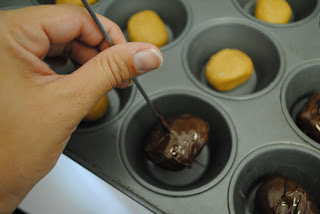
Melt chocolate into in double boiler with shortening or put in microwave for short bursts stiring frequently until melted and smooth.  Stick a skewer (I used a metal one for kebabs) in peanut butter egg and dip it in chocolate using a spoon to make sure it is covered. Place on metal baking sheet and use spoon to smooth out top covering skewer hole. While still wet you can add sprinkles. Place in refrigerator to set. once fully set you can decorate with icing if desired :) Yummy!


Shaped Peanut Butter Eggs

Dipped

ready to set, i used the muffin pan to keep them separate.